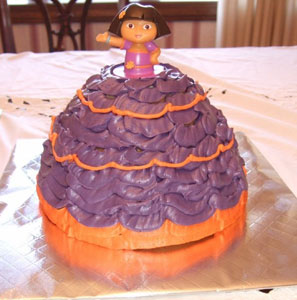
 Having children has taught me to never say never. Before I had children, I attended my best friend’s child’s first birthday party. She made a three-dimensional duck cake and I said to her, “I will never do this. I will buy cake for my kids.” Lo and behold, here I am with an 8 year old and a 6 year old and I’ve never bought a birthday cake for either of them.
I took a Wilton class at my local Michaels craft store. That one introductory cake-decorating class taught me all the basics to create the cakes you see here. By nature, I am analytical, scientific, and mathematically driven. Anything deemed “creative” is always a challenge and so it still amazes me that I created these cakes.

I find the doll cakes (such as the Dora the Explorer cake shown here) to be the easiest to attempt because you simply buy the Wilton-shaped cake pan. Then you can either buy a doll top for it like I did here with Dora, or you could take a Barbie and wrap her in plastic and put her right in to a cut-out you make right into the middle of the cake.

Are you still not convinced that you can try this? Making these cakes is similar to a color-by-numbers process. The one below is a Mickey Mouse cake that is one of my favorites. It was only the second cake I made after taking the class. Wilton makes numerous character-shaped cake pans, which can be found just about anywhere Wilton products are sold. It is also very easy to find coupons online for the pans.
For the Mickey Mouse cake, start with a cake pan that illustrates the outlines you need to decorate with. Start with the black outline of Mickey and then fill it in by using the star-shaped tip (Wilton Tip No. 16) to make the little stars. For the Monster High Draculaura cake, I used with a Barbie cake pan and customized the decorative colors to match the Monster High style. I am really proud of the way it came out.

This Ballerina Bear was for a party at my daughter’s dance school. Again I started with the outline and then filled everything in. The hardest part is squeezing the bag to create all the little stars, which tends to make my forearm hurt. But it is certainly worth it when the kids see the cake.
Hello Kitty is an easy option if you want to give this a try. Most of the work comes from stirring the colors and Hello Kitty doesn’t involve many colors.

This bear with the sports theme was one of the most complex cakes I tried because it’s three-dimensional. This cake has both sides of the bear. The cake batter went inside and the cake pan was clipped together for baking. This was for a sports party so I bought candy melts and molds for sports balls to make the four different balls that are in front of the bear. I also wrote Evan’s name on the back of the bear’s shirt.

If you prefer to try an easier style and forgo the star-tip tool, bake a rectangular cake and decorate the top. This Angry Birds Space cake involved making a ball shaped cake and frosting it. I bought an edible spray paint in silver to make it look like the planet. I bought an Angry Birds Space game to put all of the characters on. (If you are really creative you could make the birds and pigs out of fondant.) Here is an Angry Birds Pool cake that I made last year. The blue water is simply blue frosting and then blue gel on top. This is one of the easiest for anyone to attempt.

I also always like to make cupcakes to match the theme. These are easy to make yet they look professional. I start by going to eBay or local party stores to get rings as decorations. Then I use Wilton No. 1M Swirl Tip and move around the cupcake until I get to the middle. It’s very simple and cheaper than buying decorated cupcake.
You can even do this very easily with multi-colors. I filled one bag with green and one with purple and put both of those bags in to a larger bag with the tip on it. I really love these flame cupcakes and delicate ballet cupcakes.

The last treat I have tackled is Cake Pops. They are fun for kids and look super cute. Make a ball-shaped cake, dip it in melted chocolate, and decorate. Here are my Hello Kitty Cake Pops. I used white chocolate for the head, a variety of candies for the face, and white chocolate chips for the ears.

This process is easier than you think. The key is to have fun and don’t be too sad when you have to cut the cake after all that work!

